September 21, 2012

It's Called Glazing

I hesitate to even post this for a few reasons:
A. I love the color I picked, but in the context of our kitchen, it just isn't clicking with me for some reason. I just feel like it would look a lot better with a different counter (not my fault) in a different kitchen.
B. I'm not even sure if it looks better how it is now or how it was before.
C. You are seeing the kitchen I live with (all 4 square feet of it)

You now can't judge me about any of the above stated reasons. Just look at the technique and the cabinets, not the rest of the kitchen, and we will all be happy :)

But... Here's why I wanted to post it:
A. I searched and searched for how to do this and had a hard time finding instructions or tutorials on how to do it, so most of you probably don't know how to do it! I even went to the paint department in Home Depot and they had no idea what I was talking about. So maybe I can give someone a new idea or teach someone that doesn't know how to do it!
B. I was just feelin extra crafty and up for a project so you all get to hear about it :) 
AND...
C. I took all the dang pictures!

Now that you've all been debriefed, here we go!

So Trent and I moved into a new place. We really like it now. But when we were going through it the first time, we were bummed about the TINY kitchen. And i am a kitchen person, so it was rough. But there is actually a TON more storage space in the kitchen than our old place (hard to believe, I know) so we decided we would take it. Sometimes you gotta give up some things to get other things. 
But after living here for a while, I actually don't even mind the small space. It really doesn't bother me, which is surprising. The best part is we can only go up from here! Any kitchen is going to seem like a mansion kitchen from here on out!
The moment we got the place, I knew the first thing to go was the kitchen cabinets. 
They were painted like centuries ago probably. 
And it was the worst paint job ever. 
Stark white. 
Not the cute white cause i know some of you out there have cute white cabinets, no. Just ugly bland chipping old cheap white.
So I was thinking of what I could do, and I was at my moms and noticed their mantle. It was so cute! It was cream but had this kind of streaky but not, kind of paint but not, coat on top.
Cool right? 
So like i said, i looked all over pinterest and the internet and couldn't find that much about it! (Also because I didn't know what it was called.)
Finally I found some different ideas and decided to try it, and also found out...
It's Called Glazing
So I hesitate to show this picture, cause I just hurried and snapped a picture when we were very first looking at the house when the other people were moving out, so it wasn't even clean. But you get what I mean about the bad cupboards right?? And notice the two "handles" on those ones are like an inch off?? haha!
Small right? Whatev, I'm over it. 
(This is also motivation that if i can live in this kitchen, you can live in yours!!) 
 So first you have to get your supplies, obviously. 
SECRET TIP: (Not secret but it was a mystery to me!) Go to the DOLLAR STORE! They have like EVERYTHING you need to paint. Make sure you have 
  • brushes
  • a paint roller (I DON'T recommend you get this at the dollar store. Get a GOOD one, or else you will have small little fuzzies coming off into your paint every other second and it is REALLY annoying. Trust me on that one)
  • a paint pan (ya know, the plastic flat rolly bumpy thing where you roll the paint with the roller? is that what they're called?) 
  • a plastic tarp
  • painters tape (might want to get at home depot - the good stuff)
  • masking tape (for things you don't need good painters tape for - like for holding the tarp in place if you need)
  • screwdrivers to take your cupboards and the handles off
  • a drill if wanted - makes things really easy 
  • and of course, paint! I got mine at home depot. I got a gallon and probably only used half of it. But like you just saw, I didn't have a TON of space to cover. Home Depot has the Glidden brand of paint - it's cheaper and you can pick any color of paint from any other brand and they'll mix it to match that exact color. Cool right?
And if you want to do the glaze on top, get these things:
  • Stain. I got the Minwax brand of stain, and got the shade Dark Walnut - and don't worry, unless you plan on glazing the White House, you will have TONS left over when you're done for another project! They have these at Walmart for around $5
  •  
  • And then for the glaze you need to get Valspar Clear Mixing Glaze - you will also have some of this left over too. This is a little pricey - i got it for around $18 at Lowes. But it's what you gotta get! Thats what I hear anyways. It worked great for me!
  • Also a sanding block,
  • some sort of bowl, 
  • and a straw for easy mixing, but anything will do (more on that later)
All in all, I spent about $65 maybe? If you already have painting stuff, then you pretty much just need the paint, stain, and glaze, which would be about $50.

Step #1. Take off all your cupboards and take out all your drawers. Make sure they are clean!! Wipe them down with a wet cloth and let them dry. 
 Tell me i'm right when I say the paint job on these things were bad...
This is what it looked like after the cupboards and drawers were out (Thanks hubby! Couldn't have done it without you!)
Step #2: Paint away! (don't forget to put on your favorite Pandora station :) )
 Another important tip is to use painter's angles that let you paint both sides of the cupboards at the same time. (Instead of doing one side, letting it dry for ever, and then flipping it over and doing the other side and then the bottom isn't quite cured enough so it kind of smudges - don't ask how i know that)
 While that was all drying in our shop, I went back to tackle the inside part of the kitchen.
Step #1: Tape it all off (with good painters tape)
Step #2: Paint Away! (Again, don't forget Pandora - that's important!)
I did two coats - I just went through and painted everything and then by the time I was done, the part where I had started was pretty dry and went through it all again! The second coat is way quicker. 
Before and After of the inside...

Now for the fun part...
When your cupboards and drawers are all dry, you are ready to glaze!
Get your glazing items out, and put some of the Velspar clear glaze in the bowl (however much you feel like starting with, but I would say about 3/4 cup ish to start)
Then get your handy straw, and bring out your childhood thumb-over-straw-and-pick-up-liquid skills (i know you all know what i'm talking about) dipping it into the stain and then letting it release into the bowl of glaze
 You don't need very much stain. I used probably a full straw full for 3/4 cup ish. And stir it all together! My ending color was about the color of chocolate milk (see a couple pictures down). 
Don't worry - the glaze does NOT show up that dark. So it's okay if it's pretty dark, but not too dark. And you don't want it to be too light, cause you won't be able to see it very well.
After I did that, I gave my cupboards a quick sand over (literally like 10 seconds) - you don't want to sand off any paint but just roughen it a tiny bit.
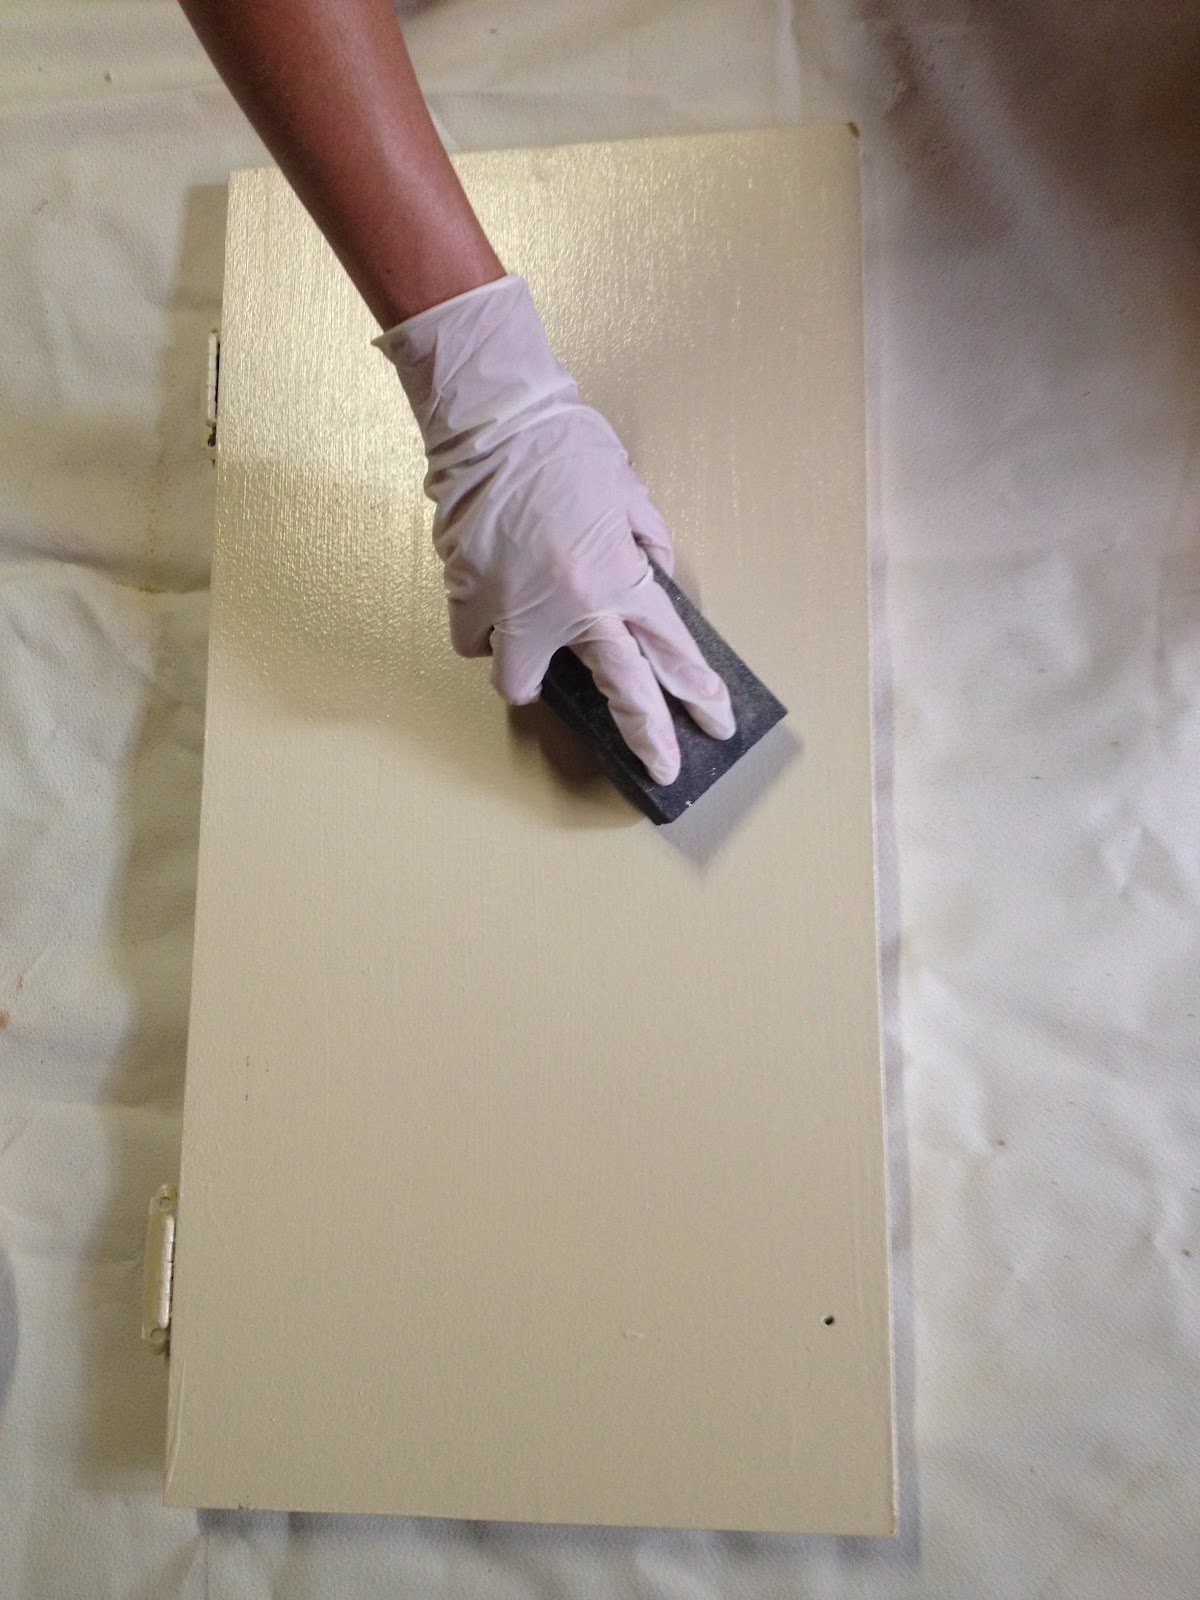
 Then get your brush and dab the stain mix all over the surface (see the chocolate milk color?)
 till it looks something like this
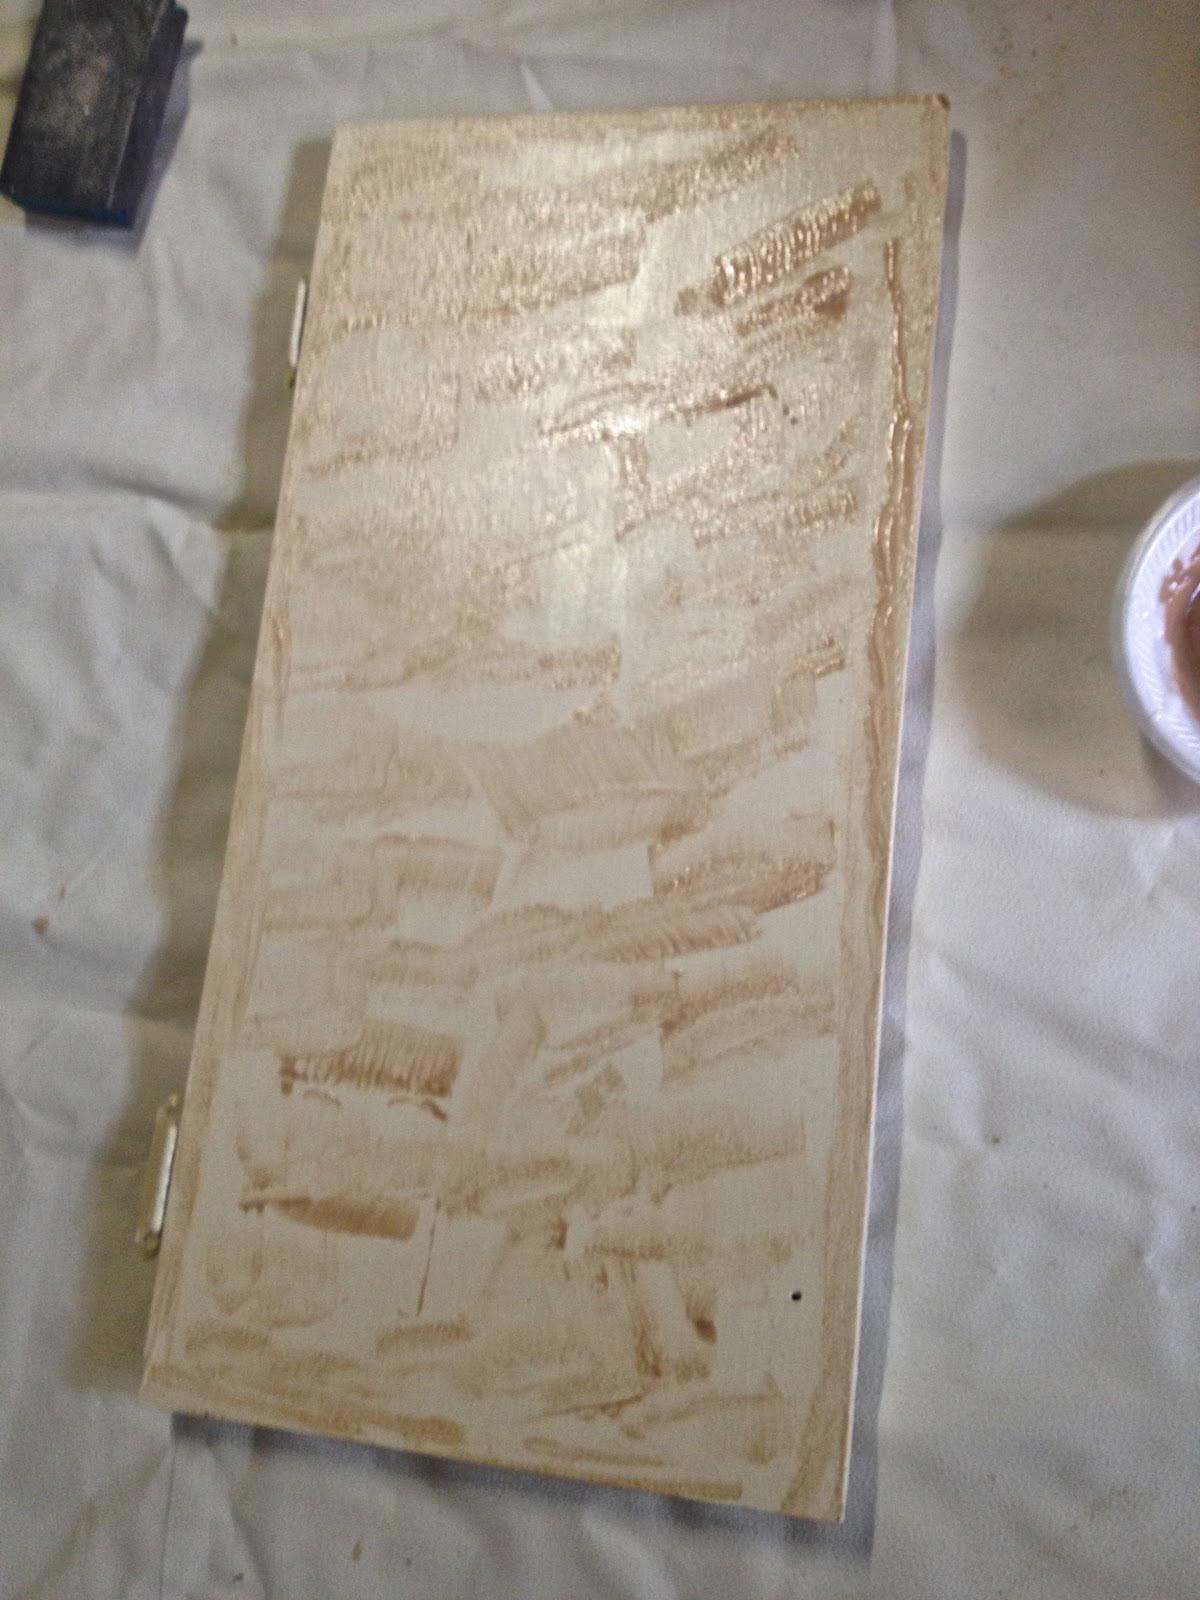
 Then I just did an up and down brushing motion to make it all smooth! 
You can really just have fun with it and experiment to see what you like. It doesn't dry that fast so you have time to work with it. If you have too much you can just use the brush to get some of it off, or have a cloth on hand to wipe it.
 And same thing with the drawers. Just make sure the texture goes the same direction (up and down) on everything, so on the drawers you don't want to go lengthwise, go up and down.
 Again, sand...
 Dab on the stain mixture (it can be messy)
 And smooth so it's all evenly spread going one direction!
If you have a whiter area or a darker area, it's okay. It adds character! You can also emphasize the edges if you want, which i think would add a cool look.
Then let it dry!!
And dry!
And dry more!
Make sure they are nice and dry when you go to put them back in the kitchen. You don't want any smudges or dings or things sticking to the paint after all that work to make them look perfect!
Reattach your cupboards back where they go, put in your drawers, and reattach all your handles - we found these ones in our shop! miraculous!
If you have a husband, he comes in here. Great help. If you don't have a husband... this is why you need a husband :)
And these are my after pictures....
 (for some reason every time I tried taking this picture, it turned out more yellow than it really is)
I hope this helps anyone wanting to do this! 
Happy painting and staining! 
If you decide to do this, let me know how it goes! It really isn't hard, it just takes the time to do it.
Also, I would love to hear your input - do you even think it looks better? I won't be offended - really. If you think it looks bad, please refer to the first paragraph. I almost didn't post this. I am aware of my surroundings haha. I'm wondering if maybe it looked better white! I hate our counter. Bad. If the counter was different, I think it would look a lot better. 
I just look at it this way, hey, i learned how to do it, so i am all practiced up for when I have to do this for real, in our real house someday where I will have to live with it forever -or for a while til i get another idea :) 
So really though, comment below. 
Okay, you've had enough of me. Bye.

September 9, 2012

Personal Peach Crumble

So I tried this awesome recipe the other day you all HAVE to try... 
They are so yummy. 
They're perfect cause they're easy, they're healthy, and they're individual so each person can have their own little one! It's not too much, but not too little - just the right amount of dessert!
The recipe I tried called them peach crisp, but i didn't like that because they're not that crisp. It's more of a peach crumble :)

Here's the ingredients:
  • 4 ripe yellow peaches (or just make it according to however many you want) (If the peaches are still a little on the hard side, it's okay because they soften a little when they bake. I think it's better to have them too hard rather than too ripe, personally. The really ripe ones get a little mushy)
  • 1/2 cup rolled oats
  • 1/2 cup white whole wheat flour (I just used normal flour)
  • 1/4 cup brown sugar
  • 1/2 teaspoon cinnamon
  • 1/4 teaspoon ginger
  • 1/8 teaspoon nutmeg
  • pinch of salt
  • 3 tablespoons melted butter
  • 2 tablespoons plain or vanilla Greek yogurt
  • 2 teaspoons real maple syrup
  • A little bit of white sugar for sprinkling on top
  • Greek yogurt or vanilla ice cream to top with when serving
Preheat your oven to 400 degrees and grease a baking pan that will fit as many peaches as you are doing. I had seven halves (I was going to have eight but one half was a little too mushy) and I used an 8x8 square pan and it worked great. 
Wash your peaches and DON'T peel. Isn't that nice? Keeping the peel on helps it to all stay together. It's like a built in shell for everything!
Cut in half and remove the pits. Use a spoon to scoop out a nice little indent for the crumble to go in. Not too much, cause you still want to eat a lot of the peach, but enough that you can fit in a good amount of crumble!
Combine the above ingredients (except for the last two - those are used later) in a bowl and mix well. 
Scoop about two tablespoons of dough into each peach half (or enough to use all your crumble mixture, or however much you feel is a good amount). Food for thought (haha): If you do have a little bit of leftover crumble mixture, just eat it. Haha. But really, it is so yummy. It's almost like granola or something. 
And no eggs right? So it's free game. 
Not like I avoid cookie dough or anything with eggs in it anyways.
Sprinkle a little bit of white sugar on the top of each one, and shove them in the oven!
Bake them for about 20-25 minutes until the tops are golden and a tiny bit crispy. 
Top with vanilla ice cream or greek yogurt!
(I used Zoi honey greek yogurt, and it is to die for. mmmmm...)
Try to not feel like you died and went to heaven - I dare you :)
Happy Peach Making!

September 7, 2012

Catch Up Time

Hey everyone! 
School has started and therefore, I don't have a life anymore. It is 
C.R.A.Z.Y. 
I feel like I just simply can't do everything I'm supposed to do (aka homework, read 942478 pages of random textbooks, write papers, go to class, cook meals, clean my house, do laundry, go to the temple, go visiting teaching, go to work, you get the point - probably sounds familiar to you!) so what do i do? 
I blog. haha.
I decided i am so sick of being behind on my blog! And i have a ton of things i want to blog about, but you know me - i can't blog about something until i get to it chronologically, so i can keep everything in order.
SO,
i am going to do ONE grand, brief catch-up post. Like a fast forward of our lives! Basically from May until now. haha only like 3-4 months right? Right? So get comfy, here we go!

My cute as ever nephew Rome - has good style I must admit!
I had a little incident where I was up in Salt Lake and ran out of gas, but completely forgot my wallet was in my purse and i only had my backpack!! Don't mind the fact that I was RIGHT next to the homeless shelter. Luckily I found $2.23 in my car, and was able to make it to my cute Grandma & Grandpa Hansen's and they saved the day! I've never been so happy to see a $20 bill in my life!
We babysat my cute cousins - Donny & Summer's kids! This entailed us getting talked into going to the Humane Society, which was funny! And interesting..! And me being more excited to do the teeter totter than any of them!
We went up to ... (is it Pinecone or Porcupine Reservoir? I forget everytime, thanks a lot Tiarra!) It's up in Logan - with Britt, Camille, Tiarra, Will and their kids, and it was so fun!
Someone was a little excited to try to spearfish, except the water was freezing!!
Tell me this doesn't look like a baptism picture! Haha!
Model child! hehe
I just can't get enough of him sometimes! so cute!
look at the leaf i found!


Trent's family came to salt lake! We went to city creek and then played bocci ball at a park! So fun!
My daddy's grave on Memorial Day, it looked so pretty
Little getaway to Park City!
Trent & I babysat this family in my mom's neighborhood for almost a week, it was an adventure! Their house was amazing though... hope they don't mind me posting pictures haha.
Sauna in the Master Bath
Trent playing with Calvin in their basement sport court!
We got so hooked on this dumb pinball game!!
loooved having a fast car to drive for the week. I need one.
My favorite part - the bath fills from the ceiling!
Playing with Trent's waterproof iphone case in their pool!
Then it was time for my family reunion! My great grandma on my dad's side of the family takes the whole extended family, all 130 of us, up to Aspen Grove for a week every other year. We have so much fun! We just love our family.
We went to a firework show for the 4th of July during the week, it was the best firework show ever! We were laying right under the fireworks, so it was SO awesome! Parts of the fireworks were even falling on us!
Doing the ropes course at Aspen Grove! sorry it's a little blurry, not my fault :)
You can't really tell but this is Jeremy and I together on a wire way up there!
It rained and we got a little carried away, haha
My hunny bunny playing tennis - isn't he cute?!
CUTEST thing ever. Amy & I are sitting in the arts & crafts place painting, when out of nowhere this butterfly comes in the door and lands on her finger! It kept flying around her and landing on her, and wouldn't fly anywhere else! Somehow I captured the moment it landed on her nose!
Trent and I moved to a new place. To put it short, we love our new place! It's so much bigger & we have more space for our stuff, and let me tell ya - we have a lot of stuff. How i don't know, but it's insane. We do miss Ryan and Nat at our old place, but we are happy to live in a place where we feel like it's kind of our own little place! And we have a yard! And trent has a shop that he loves :) Anyways, I was feeling super motivated thanks to Pinterest and felt the huge need to paint our kitchen cupboards. I will post pics soon...
This is a long story, but i had to add it to advertise how much we dislike/HATE comcast. Basically we went to return our cable box to them, got there RIGHT at 6:00 on the dot and they had already locked their doors, and FOUR people just stared at Trent as he held up the box, ignored him, and walked away. K at least have the decency to come to the door and be like "sorry we are closed now, our systems are shut down and we're not allowed to return it now" or something! So what did he do? He threw the box on top of the grate thing above the door (see it in the pic?) Haha!! He was really mad but I was like dying laughing watching in the car! 
So! 
Don't get comcast!
 Their customer service is SO bad. Like it's not even worthy of being called service. Gets me all worked up!
Tiarra & I went to THE funniest yard sale of my life. "Wish Rocks - Free to good home." Haha!! PS they weren't joking
Good times with T at yard sales!! haha we always have fun adventures :) PS this is her table she bought for a steal of a deal! cute right?! (minus me being a dork!)
Logan Rodeo!
Ryann and "ucle tret" snuggling, aw!
Sorry Ryann - I really do love you too. I just have more pictures of Rome for some reason! Not like her 3 year old self is reading this.
I had been dying to play Clue for ever! Tiarra and I found a wayyy old version at a yard sale, so i got it, for 25 cents :) haha
I made cake pops!! Tutorial coming soon :) (see what I mean? I have a lot of blogging to do!)
Every August my family goes to Lake Powell. The night before, I was packing at midnight (of course) and realized that i couldn't find my black swim suit bottoms - anywhere! Last year I had bought (boughten? haha bought sounds weird) a lot of tankini tops and I just wore my black bottoms with almost all of them. And those black bottoms were MIA (and still are). So in the morning on our way to meet everyone, I stop at Kmart. Surely they would have some plain black bottoms, but of course everyone is excited about halloween already and swim suits were like so last season (happens to me every year and i get really annoyed every year). So I try ShopKo, my last resort, and lo and behold, in the kids section, I found this. A Justin Bieber swim suit. Awesome. Thanks Biebs for saving my day (and thanks for being on clearance!)
haha!
September through July we all seem to drive around just fine and have no car problems. But it seems like every year, it's just not Lake Powell if you don't have car issues. So we got delayed a little bit, but of course it's always a good time when you're with the Adamsons!
 Like always, we had so much fun at Lake Powell! I don't think one of us took a single picture! (Not typical when Riley is aboard!) It was kinda nice though! We were all just so into having fun that we forgot to take pictures. So just believe me when i say we skied (that looks weird - skiied? ski-d?), we wakeboarded, we fished, we ate all day long, we got some sun, and now you don't even need pictures! There!

In other news... 
My lifelong best friend Erika got married!! I just love her! 
She was such a beautiful bride & had such a pretty wedding! 
I'm so happy for her & so excited that she gets to discover the fun world of marriage! 
Yay!!
Jeremy got his Eagle Scout award! Congrats Bear! Such a proud big little sister :)
My mom made us the cutest little "back to school basket!" I had it sitting out all week like this cause i thought it was just so cute of her! Thanks mom!
And that brings us to the end of our summer.
:(   :(   :(   :(   :(
I love summer. I never want it to end. 
Fun fact about Natalie: It bugs me that people get excited about fall and halloween and stuff so early. It's like "hey, it's summer, let's enjoy summer while it's summer, and enjoy fall when it gets here. Enjoy what's here when it's here." For the record, this rule doesn't apply in February when we're all dying for it to be spring again.
And then we have to go back to school which makes it even harder. 
I could cry just thinking about it. I think i have summer-over-sadness-syndrome.
Not really, but really.
Come back summer! 
Come back... Come back... Come back... come back...  (as it dramatically echoes off into the distance...) 
haha! i crack myself up. 
(Picture taken by my brother Riley!)