
In the Crane household, it was obvious that Pinterest came to be this year.
I found all these DIY craft ideas and with Christmas coming up, I couldn't resist.
It was SO fun.
And it is what got me through death-week finals, I was so excited to get started on my crafts! My cute friend Natalie (no wonder I like her!) got in on it with me, so we worked on them together! Trent and I just love Natalie and Ryan. We could hang out with them for days on end. It does get a little confusing sometimes when our husbands say "Nat?" and we both say "yes?" haha.
My first craft I did, found on Pinterest, was a menu board. We LOVED the idea so we decided to copy it. Here's a little tutorial if ya wanna make one yourself! It was cheap and fun and was easy to stylize how you wanted :) I made this for my mom, but I was tempted to keep it for myself!
First we got a bulletin board from Walmart for $6.50, two different prints of scrapbook paper (red paisley and light blue for me), pushpins, clips, ribbon, 5x7 cards, and paint.
First, paint the bulletin board.


Then, we painted the clips and pushpins (funny I know).


Then size the paper to the board and cut it out so the prints line up. This was the hardest part believe it or not! We tried using modpodge to glue it to the board, but it curled. So we then tried using nail glue, but that didn't really work either. We then tried a plain old glue stick and that seemed to work pretty well.

Cut out squares of paper for the days of the week and for the two pockets. We used a stencil and paint to put the letters on.


I asked my mom a few weeks prior (in a discreet way) to give me a list of things she liked to make for dinner (I "needed ideas" hehe) and I wrote those out on the cut slips of paper, and left some blank ones too for her to write her own on when she thought of more.

Then just glue on the letters of the day, attach the ribbon with the pushpins, attach the pockets with pushpins, put the 5x7 cards in one pocket (to write the recipes on), put the slips of paper in the other pocket, and attach the clips! Way fun, easy, and turned out great!
This was Natalie's (the other Nat)

And this was mine, yay!
This was Natalie's (the other Nat)

And this was mine, yay!


Meanwhile... While Nat and I are busy being little artsy busy crafters, here is what our husbands did.


Basically it's really easy. You just get some berries and hot glue them on. It does take a while, but its really easy.


And then you tie your ribbon in a bow, attach some sort of a hook (we realized we would need a hook when we were done and used the ends of little holly branch, luckily they worked perfect!), hot glue them all together, and there you have it!

Nat did a "G" for her mother in law. They turned out so cute!


The next little project I did was one I have been wanting to do for a while! A couple years ago I discovered Uppercase Living at a friends house. They do the cutest vinyl expressions that are the big thing nowdays. I found a phrase that reminded me of my cute Grandpa Adamson who just LOVES to fish. So I ordered it and away I went.
I needed wooden boards for a few different projects as you will see so I went to Home Depot with my brother Riley and got a big huge sheet of wood for a great price! I had them cut it down to the sizes I needed and we were good to go! As we were walking to the car, Riley was like "geez, I need to bring you with me every time i come here... it's not every day a little blonde girl comes in needing stuff from them!" Apparently i can get what i want at home depot! haha
Anyways, so I sized the wood to the expression, sanded it, and painted it a cream/beige color

Then Trent helped me line up the expression

and rub it on! I think it turned out cute :)

One more project I did.
So in Trent's family, the siblings all draw names and they do homemade gifts! I think that is the cutest idea and has been SO fun the last two years they've done it. It makes the gift so much more meaningful than your typical gift card or something - even though gift cards are great too :)
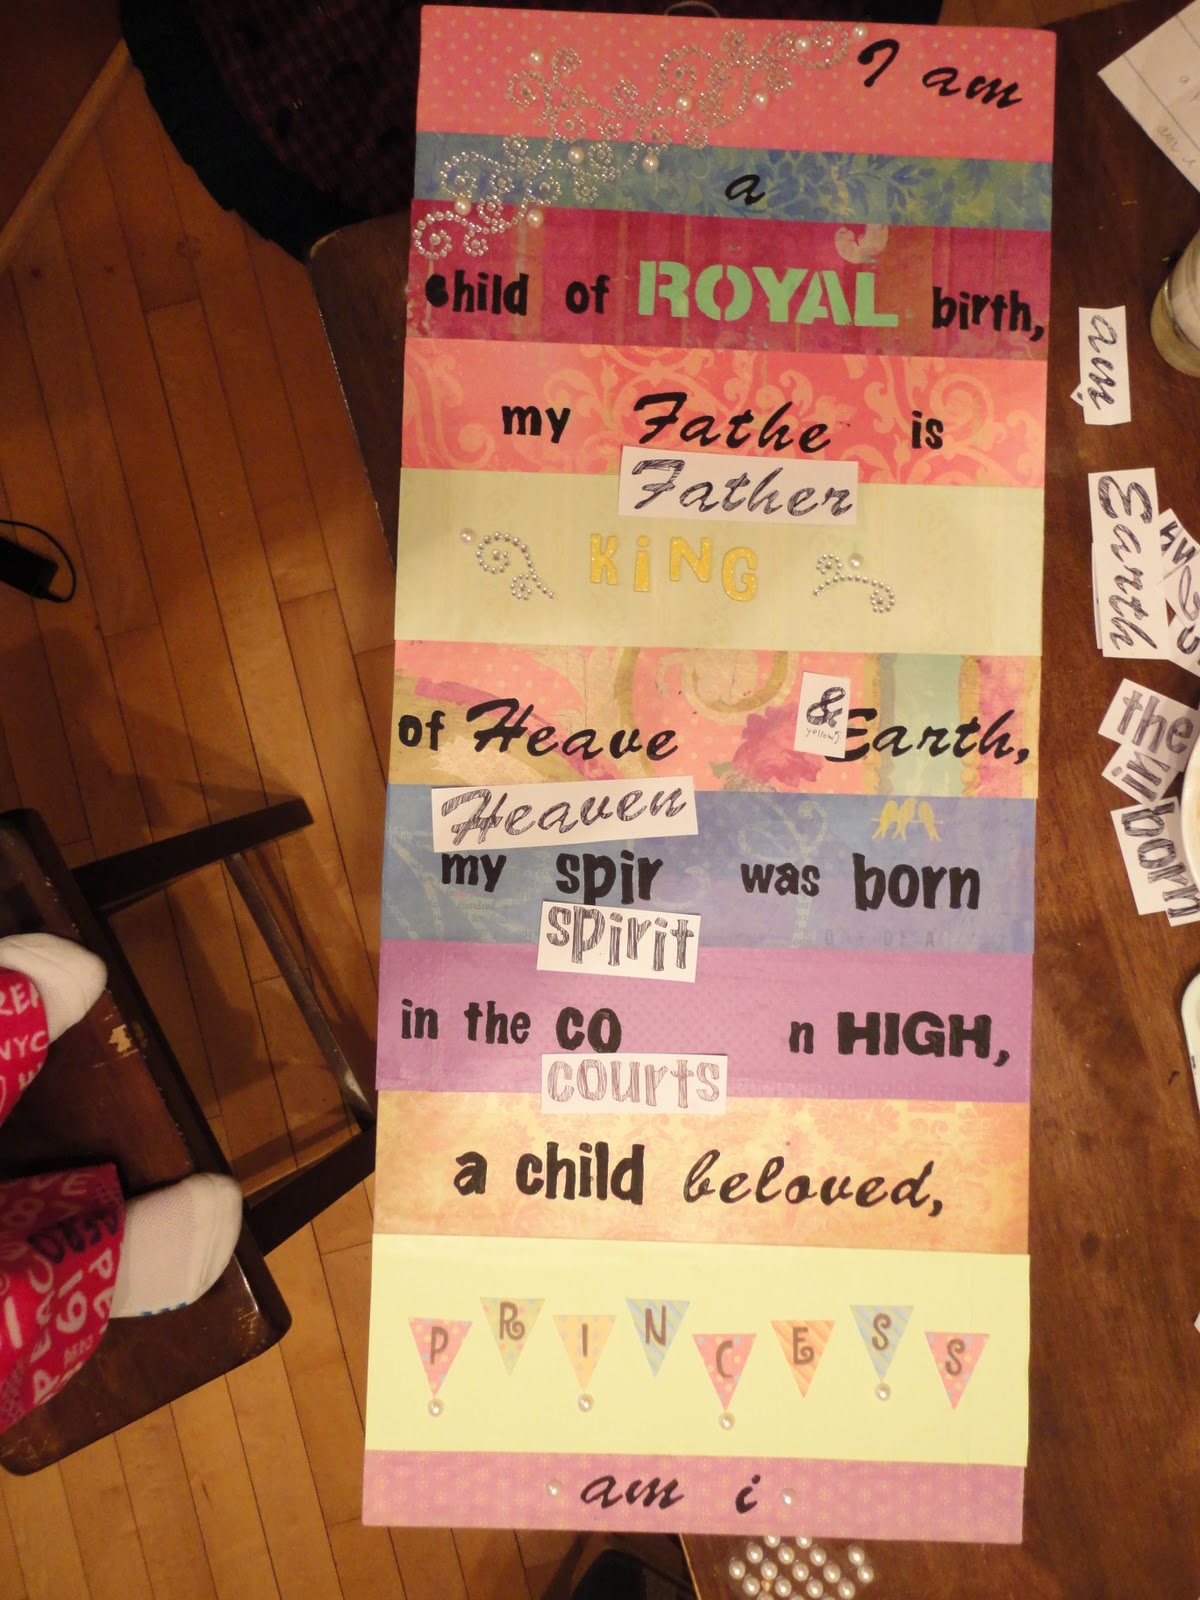
So I drew his little sister Hallie. She just turned 12 this year and graduated to Young Women's! Haha. So I saw something, once again on Pinterest, that sparked this idea. Basically it is a wooden board with a cute quote on it to hang in her room. So i got a wooden board 12x28, sanded it


I have a big pad of different papers, picked a bunch that matched the colors of her room and arranged them how I wanted.

To explain the quote I chose, I don't really remember where I first heard it, but I got it on a little handout when I was little and have remembered it ever since. I love it and it makes me remember who I really am :) I thought it would be good for Hallie too going through Young Women's and those crazy teenage years.
So it was hard to decide how to put the words on the paper, but I ended up going with a few stickers, but for the most part I used stencils and painted it.
But first I modpodged the papers onto the board (and forgot to take a picture before I got started haha)


Well that's the end of my crazy Christmas craft kick. Here is all of them together, minus the quote board for Hallie.

LOVE! I've seen a bunch of these on Pinterest and keep meaning to do them - it's inspiring to see that you really put it all to good use :) They look awesome
ReplyDeleteCute crafts Natalie! I'm impressed. I LOVE that wedding picture! You are so gorgeous!
ReplyDeleteThanks Claire and Summer! You guys are sweet. Summer, Trent and I need to be better about visiting you guys! We always say we need to have a game night or something but we really do! Maybe we should take action and plan an Adamson game night far enough in advance that nobody will have an excuse not to be there and all we can do is play games for a whole night :)
ReplyDelete